
Vue-SpringBoot-分离-部署
说一下我的初衷
我用vue+springboot写了一个博客,打算长久编码使用。国内服务器一般按限带宽不限流量,我有一台1M带宽的服务器,这个情况加载Vue压缩的几兆大小的js文件是很难受的。就思量着把前端放在腾讯云的对象云存储的桶里(主要是想用coding平台的ci,你们可以选择任意的pages服务),把后端放在服务器上,会快很多。
预备
- 技术栈:vue+elementui+springboot+springsecurity+springdata
- 后台管理的页面是放在前端的,既然想省带宽就一不做二不休,可是想想如果做主题的话会比较麻烦,以后的事以后再讲吧。
- SpringBoot端口8080
- 在服务器上装了一个宝塔面板,管理网站很方便。
- 我博客的域名是blog.unwi.net,给后端分配一个次级域名be.blog.unwi.net,
- 文章中只提供重点代码,还有疑问可移步源码或者留言
跨域访问
本身学艺不精,还没搞懂怎么携带csrf token,直接disable了。后面再补充。
前端封装一个axios实例,重点是withCredentials: true
/**
 * 基础配置
 */
const baseConfig = {
  baseURL: process.env.VUE_APP_API_HOST,
  // 表示跨域请求时是否需要使用凭证
  withCredentials: true
}
后端配置一个bean即可。
    /**
     * spring security 会自动寻找这个Bean
     * @return
     */
    @Bean
    CorsConfigurationSource corsConfigurationSource() {
        CorsConfiguration configuration = new CorsConfiguration();
        // 表示跨域请求时是否需要使用凭证
        configuration.setAllowCredentials(true);
        configuration.setAllowedOrigins(Arrays.asList(SecurityConstants.CROSS_ORIGINS));
        configuration.setAllowedMethods(Arrays.asList(SecurityConstants.CROSS_METHODS));
        configuration.setAllowedHeaders(Arrays.asList("*"));
        UrlBasedCorsConfigurationSource source = new UrlBasedCorsConfigurationSource();
        source.registerCorsConfiguration("/**", configuration);
        return source;
    }
自动部署
这里就是用coding的ci完成提交代码自动部署前后端的任务,说实话coding的ci不如华为云的好使,但是华为的代码托管不好使,又长期依赖coding。做这类工具不少,慎重选择。
coding的项目功能中打开持续集成,打开里面的构建计划,新建一个后端的pipeline,停止springboot进程采用的是接收一个http请求关闭spring的context,详见SystemController.java
pipeline {
  agent any
  stages {
    stage('检出') {
      steps {
        checkout([
          $class: 'GitSCM',
          branches: [[name: GIT_BUILD_REF]],
          userRemoteConfigs: [[
            url: GIT_REPO_URL,
            credentialsId: CREDENTIALS_ID
          ]]])
        }
      }
      stage('编译') {
        steps {
          sh 'gradle clean'
          sh 'gradle bootJar'
        }
      }
      stage('部署和收集') {
        parallel {
          stage('部署') {
            steps {
              script {
                def remote = [:]
                remote.name = 'server'
                remote.user = 'root'
                remote.allowAnyHosts = true
                remote.host = env.HOST
                // 需要先创建一对 SSH 密钥,把私钥放在 CODING 凭据管理,把公钥放在服务器的 `.ssh/authorized_keys`,实现免密码登录
                withCredentials([sshUserPrivateKey(credentialsId: env.CREDENTIALS, keyFileVariable: 'id_rsa')]) {
                  remote.identityFile = id_rsa
                  // 备份
                  sshCommand remote: remote, command: 'tar -zcvf '+env.DEPLOY_PATH+'../ulog.bak.tar.gz '+env.DEPLOY_PATH
                  // 清理
                  sshCommand remote: remote, command: 'rm -f '+env.DEPLOY_PATH+'*'
                  // SSH 上传文件到远端服务器
                  sshPut remote: remote, from: './build/libs/ulog-'+env.VERSION+'.jar', into: env.DEPLOY_PATH
                  // 停止springboot
                  try {
                    sshCommand remote: remote, command: 'curl -X POST http://localhost:8080/system/shutdown'
                  } catch (err) {
                    echo '已忽略关闭springboot错误'
                  }
                  // 启动
                  sshCommand remote: remote, command: 'nohup java -jar '+env.DEPLOY_PATH+'ulog-'+env.VERSION+'.jar>'+env.DEPLOY_PATH+'output.log 2>'+env.DEPLOY_PATH+'error.log &'
                }
              }

              echo '部署完成'
            }
          }
          stage('收集') {
            steps {
              codingArtifactsGeneric(files: 'build/libs/*.jar', credentialsId: '${env.CODING_ARTIFACTS_CREDENTIALS_ID}', withBuildProps: true, repoName: 'releases')
            }
          }
        }
      }
    }
  }
再建一个前端的,这个可以直接选vue+cos的模板创建
pipeline {
  agent any
  stages {
    stage('检出') {
      steps {
        checkout([$class: 'GitSCM',
        branches: [[name: GIT_BUILD_REF]],
        userRemoteConfigs: [[
          url: GIT_REPO_URL,
          credentialsId: CREDENTIALS_ID
        ]]])
      }
    }
    stage('安装依赖') {
      steps {
        sh 'npm install'
      }
    }
    stage('编译') {
      steps {
        sh 'npm run build'
      }
    }
    stage('上传到 COS Bucket-收集') {
      parallel {
        stage('收集') {
          steps {
            codingArtifactsGeneric(files: 'dist/', credentialsId: '${env.CODING_ARTIFACTS_CREDENTIALS_ID}', withBuildProps: true, repoName: 'releases', zip: 'dist.zip')
          }
        }
        stage('上传到 COS Bucket') {
          steps {
            sh "coscmd config -a ${COS_SECRET_ID} -s ${COS_SECRET_KEY} -b ${COS_BUCKET_NAME} -r ${COS_BUCKET_REGION}"
            sh "coscmd upload -r ${COS_UPLOAD_FROM_PATH} /"
            echo "上传成功,访问 https://${COS_BUCKET_NAME}.cos-website.${COS_BUCKET_REGION}.myqcloud.com 预览效果"
            echo "您也可以访问原域名 https://${COS_BUCKET_NAME}.cos.${COS_BUCKET_REGION}.myqcloud.com/index.html 预览效果"
          }
        }
      }
    }
  }
}
反向代理
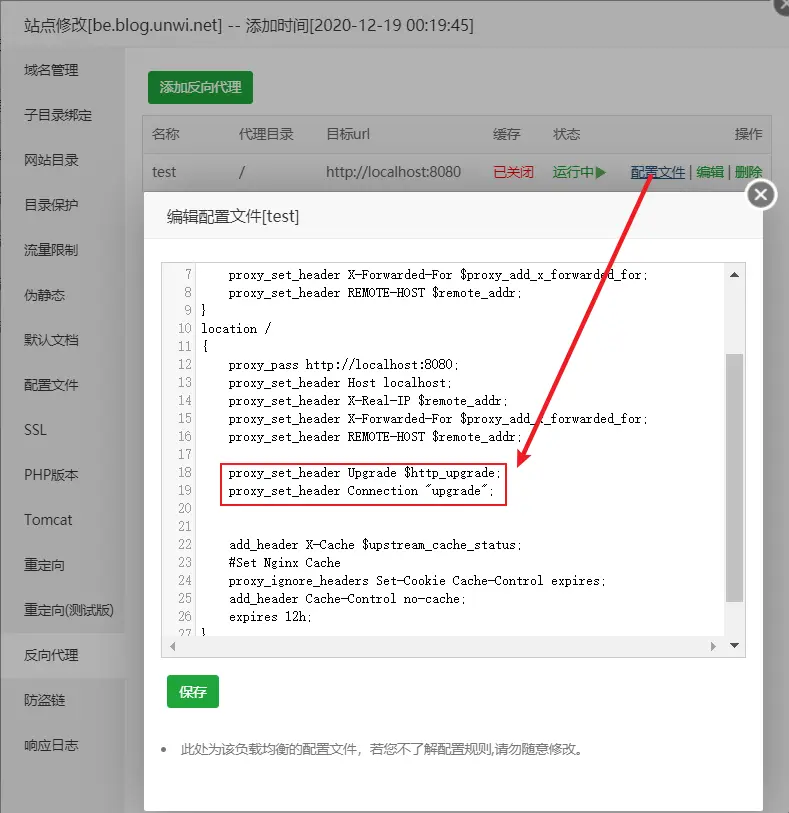
在宝塔面板新建一个后台be.blog.unwi.net的网站,配置反向代理到 localhost:8080
对于websocket,在反向代理里加两句
proxy_set_header Upgrade $http_upgrade;
proxy_set_header Connection "upgrade";


Comments ()